Technique
How to Focus at Night: Sharp Stars Every Time
Bad focus ruins more night photos than anything else. The exposure can be right and the sky clear, and every star still comes out as a soft disc because the lens was set slightly short of infinity. Learning how to focus at night isn't hard, but there's very little room for error. The sharp point is a fraction of a millimetre of ring travel, autofocus stops working in the dark, and the focus shifts as the lens cools. Below is one method that works on any camera, the tools that make it faster, and what to do when there are no stars to focus on.
At a glance
- Method: manual focus, live view, the brightest star or planet, magnified 10×. Turn the ring until the star is as small as it gets, then tape the ring.
- Not the infinity mark: modern lenses focus past infinity on purpose, and the true point moves with temperature. Use the mark only as a starting position.
- Check it: take one test frame and look at it at 100% in the centre and a corner before you start the sequence.
- Refocus: after any lens change, any bump, and about every hour on a cooling night.
- Foregrounds: anything closer than the hyperfocal distance needs a second frame focused on it.
Why autofocus fails in the dark
Both autofocus systems in a modern camera are passive. They read the image through the lens and look for detail. Contrast detection moves the focus until the difference between neighbouring pixels is greatest. Phase detection splits light from opposite sides of the lens into two images and measures their offset. Both need light and edges. A night sky is a black field with a few points a handful of pixels wide, so the lens hunts, gives up, or reports that it's in focus when it isn't. The AF-assist lamp lights a subject a few yards away, which is no use at infinity.
Autofocus will sometimes lock on the Moon or a bright planet. If it does, switch to manual afterwards, or the next half-press will move the focus.
Why the infinity mark isn't infinity
Turning the ring to the ∞ symbol or the hard stop worked on manual lenses built forty years ago. It doesn't work now, for three reasons.
- Deliberate over-travel. Autofocus lenses are built to focus a little past infinity, to allow for manufacturing tolerances and thermal expansion. If the lens has a hard stop, it's past infinity.
- Temperature. The true infinity point shifts as the lens cools. Focus set at dusk at 59 °F can be visibly soft at 36 °F. That's also why the "focus on a hill in daylight and paint a mark on the ring" shortcut fails. Use the mark to get close, then finish on a star.
- Focus-by-wire. On most mirrorless lenses the ring isn't linked to the glass. It sends a signal to a motor. There's no hard stop, and the same ring position can mean a different distance after the next power-up. A painted mark is no use on these lenses.
How to focus on stars: live view at 10×
This is the method. It takes about a minute once you've done it a couple of times.
- Set the camera up for viewing. Manual mode, widest aperture, ISO 3200 or higher, shutter 15–30 s. These settings aren't for the photo. They make live view bright enough to show stars. Turn stabilisation off and manual focus on.
- Find the brightest thing in the sky. A planet is best. Jupiter reaches magnitude −2.9 and Venus is brighter still. If no planet is up, use a first-magnitude star. Vega (0.03) and Capella (0.08) are two of the brightest and are well placed on northern autumn evenings.
- Centre it in the frame and magnify live view as far as it goes, usually 10× or more. Stars away from the centre are distorted by lens aberrations, which makes focus hard to judge. The centre doesn't have that problem.
- Turn the ring slowly through the sharp point and back. The star swells, shrinks to a tight point, and swells again. Stop where it's smallest. On a focus-by-wire lens turn the ring as slowly as you can, because a fast turn skips past the sharp position.
- Put your shooting settings back without touching the ring.
Not sure what's up right now? Search Jupiter, Vega or Capella in the 360° sky. Still Dark shows each one's altitude, direction and magnitude for your location and time, so you can pick the brightest object high enough to be clear of haze, then use AR mode to point the camera at it.
Lock the focus, then check it
Tape the ring. A strip of gaffer tape from ring to barrel, or a silicone lens band, stops the ring turning if you brush it with a hand, which is easy to do in the dark at 2 am. On focus-by-wire lenses some bodies reset focus on power-up, so check after every power cycle.
Take a test frame. Shoot one full exposure at your real settings, play it back, and magnify to 100%. A star in the centre should be a hard dot with no halo. Then look at a corner. If the centre is a dot and the corners aren't, the cause is the lens, not the focus (see lens flaws below). If the centre itself is a disc, go back to live view.
Repeat when anything changes: a lens swap, a filter, a knock to the tripod, or an hour on a cooling night. Deep-sky imagers refocus every 30–60 minutes for temperature alone.
Focus peaking and the Bahtinov mask
Focus peaking colours high-contrast edges in live view. It doesn't work well on stars. It highlights bright pixels, not sharp ones, and at high sensitivity it highlights noise too. It gets you close but can't tell nearly sharp from sharp. Use it at medium sensitivity for the first rough turn and confirm with a test frame.
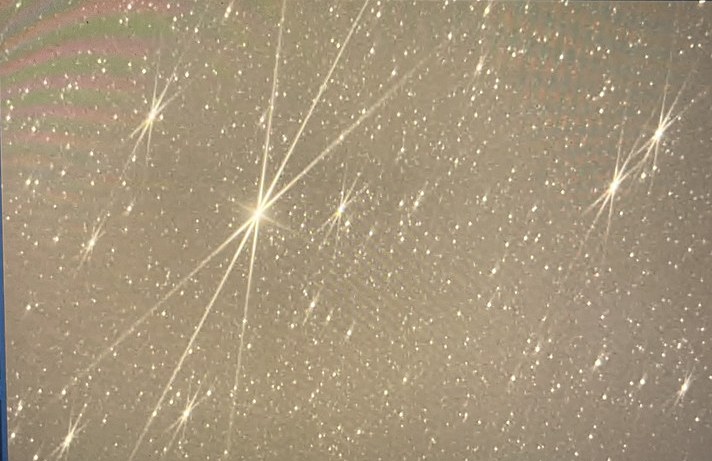
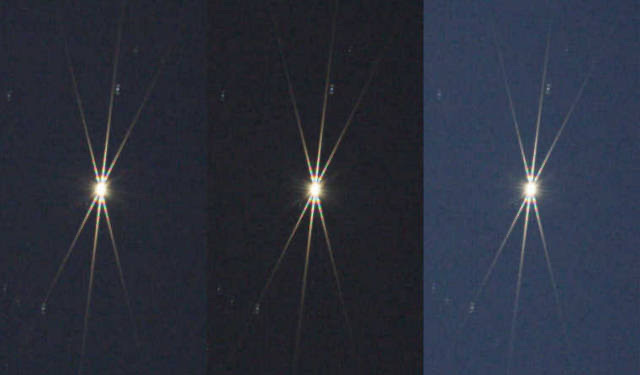
A Bahtinov mask makes focus much easier to judge. It's a flat plate with three sets of angled slots that sits over the front of the lens. Invented by the Russian amateur astronomer Pavel Bahtinov in 2005, it turns a bright star into three diffraction spikes: two forming an X and a third crossing them. As focus moves, the central spike slides one way while the outer pair move the other. Focus is exact when the centre spike sits halfway between the other two. At 10× the pattern is easy to read.
Masks that clip into a lens filter thread are sold in sizes from 49 mm to about 105 mm, free print files exist for most threads, and they're cheap. There are two limits. The spikes are small on short focal lengths, so a 14 mm lens needs a very bright star at full magnification. And the mask has to come off before the exposure, which is easy to forget.
How to focus at night when there are no stars
The question we get asked most is what to focus on when cloud or twilight hides the stars. Any small light that's far enough away will do, and for a wide lens it doesn't have to be very far.

- A distant light. A streetlight, a lit window, a beacon on a tower. Anything over 300 feet away is infinity for a wide-angle lens.
- A headlamp at the hyperfocal distance. Set a headlamp on a rock at or beyond the distance in the table below (23 feet for 24 mm at f/2.8) and focus on it. For the sharpest stars put it farther away. At 100 feet it's effectively at infinity for any lens up to 50 mm at f/2.8.
- A phone screen at 100 feet. Prop a phone showing a white screen against a fencepost. It's bright and small with a clean edge. Autofocus will often lock on it, and then you switch to manual.
Focusing for foregrounds: the hyperfocal distance
A tree, a rock or a person in the foreground is much closer than infinity. One way to deal with that is the hyperfocal distance. Focus there and everything from half that distance to infinity is acceptably sharp, where "acceptable" means a blur circle of 0.03 mm on full frame, the standard circle of confusion for 35 mm photography. Computed from H = f² / (N·c) + f with c = 0.03 mm:


| Focal length | Hyperfocal, f/2.8 | Sharp from | Hyperfocal, f/4 | Sharp from |
|---|---|---|---|---|
| 14 mm | 7.7 ft | 3.9 ft | 5.4 ft | 2.7 ft |
| 20 mm | 16 ft | 7.8 ft | 11 ft | 5.5 ft |
| 24 mm | 23 ft | 11 ft | 16 ft | 7.9 ft |
| 35 mm | 48 ft | 24 ft | 34 ft | 17 ft |
| 50 mm | 98 ft | 49 ft | 69 ft | 34 ft |
These are computed values for full frame. On APS-C use about 0.02 mm, which makes every distance half as long again. The problem is that 0.03 mm was chosen for prints viewed at arm's length, and stars at the hyperfocal setting are visibly fatter at 100% than stars focused at true infinity. That's fine for a small print but not for a large one. The aperture and hyperfocal distance guide works through the maths with a real example.
The better way is two frames. Focus on a star and shoot the sky. Then, without moving the tripod, refocus on the foreground and shoot again, lighting it briefly with a headlamp if needed. Blend the two with a mask along the horizon and both the sky and the foreground are in focus.
Camera Tools in Still Dark shows the field of view your lens and sensor cover, so you can see whether a foreground fits before you set up, and gives the longest exposure before stars trail by the NPF rule (which accounts for pixel pitch and aperture) or the older 500 rule. The Planner draws the same field of view on the map.
Telephoto lenses and the Moon
The Moon is the one night subject where autofocus usually works. Check by eye anyway. Put the limb or the terminator in live view at 10× and turn the ring until crater rims are hard edges. Take a test frame at the Moon's own exposure, around 1/250 s at f/8, ISO 100–200 for a full Moon, and check it at 100%. If the edge is soft, it may not be the focus, because a long lens also magnifies turbulence in the air. In poor seeing the limb shimmers and nothing looks sharp at any focus setting, so shoot a burst and pick the steadiest frame. For stars the method is the same, but a Bahtinov mask is much easier to read because the spikes get bigger with focal length.
Lens flaws that look like misfocus
A sharp centre with bad corners is almost never a focus problem. Fast wide lenses at full aperture have two aberrations that only show up on stars.
- Coma turns corner stars into little comets or seagulls, tails pointing away from the centre of the frame.
- Astigmatism stretches corner stars into short lines or crosses.
Both shrink quickly as the aperture closes. Half a stop (f/1.8 to f/2.2, f/2.8 to f/3.5) fixes most of it, and a full stop usually fixes all of it. The centre gains nothing from stopping down, so you're trading better corner stars against a longer exposure. Test your lens once at three apertures and you'll know the widest aperture you can use.
| Symptom | Likely cause | Fix |
|---|---|---|
| Every star a fat, soft disc, centre included | Focus short of or past infinity | Redo the live-view star focus at 10×. Ignore the ∞ mark. |
| Centre sharp, corner stars like seagulls or comets | Coma at full aperture | Stop down half a stop to a stop |
| Bright stars with a coloured halo | Chromatic aberration, or dew forming | Stop down. Check the front element, fit a dew heater. |
| Sharp centre, soft edges all round | Field curvature, or a filter on the front | Remove filters. Stop down one stop. |
| Sharp early, soft an hour later | Temperature drift, or a nudged ring | Refocus every 30–60 min. Tape the ring. |
| Everything soft, all over, all night | Stabilisation on, wind, loose tripod head | IS off on a tripod. Hang weight. Tighten the head. |
The focus checklist, and phones
- Manual focus, stabilisation off, tape ready.
- Viewing settings: widest aperture, ISO 3200+, 15–30 s.
- Brightest star or planet, centred, 10×. Stop when the star is smallest.
- Tape the ring.
- Shooting settings back in.
- Test frame, 100%, centre and corner.
- Refocus after lens changes, bumps, and each hour.
Phones work the same way but have fewer controls. In the standard camera app, tap and hold on the Moon or the brightest star until the AE/AF Lock badge appears, then release. Focus and exposure stay fixed until you tap again. If nothing is bright enough to lock on, use a distant light. Manual-camera apps have a focus slider. Push it to the far end, then back off a fraction while watching a magnified star. The iPhone astrophotography guide covers this in more detail.
Common mistakes
- Turning the ring to the hard stop and shooting. On every modern lens the stop is past infinity.
- Focusing on an off-centre star, where coma makes every position look wrong.
- Trusting focus peaking alone. It shows contrast, which isn't the same as sharpness.
- Never checking a test frame at 100%. Soft focus doesn't show in fit-to-screen playback.
- Focusing once and shooting all night. Focus shifts as the lens cools.
FAQ
Can I just set the lens to the infinity mark for night photography?
No. Autofocus lenses focus past infinity to allow for tolerances and temperature, and on focus-by-wire lenses the ring position has no fixed meaning. Start at the mark, then finish on a bright star in magnified live view.
How do I focus at night if I can't see any stars?
Use any distant point of light: a streetlight over 300 feet away, or a headlamp or phone screen placed 100 feet away. For a wide lens that's effectively infinity.
Why are the stars in the corners of my photos shaped like seagulls?
That's coma, a lens aberration at full aperture. It isn't misfocus, and the centre of the same frame will be sharp. Stop down half a stop to a stop.
How often should I refocus during a night of star photography?
After any lens change or knock, and about every hour when the temperature is falling. Dedicated astrophotographers refocus every 30–60 minutes.
Sources and further reading
- Wikipedia — Bahtinov mask (inventor and date; how the central spike moves against the outer pair).
- Wikipedia — Hyperfocal distance (the H = f²/(N·c) + f formula and the 0.03 mm circle of confusion for 35 mm).
- Have Camera Will Travel — Why "Infinity" on Your Lens Isn't Actually Infinity (tolerances, temperature, deliberate over-travel).
- Lonely Speck — Focusing at Night: A Tutorial (live-view magnification, taping the ring, test frames, the SharpStar mask).
- Michael Frye — Focusing in the Dark (distant lights and a headlamp as focus targets).
- Cloudy Nights — Focus Drift from Temperature on Camera Lenses (refocusing every 30–60 minutes as the lens cools).